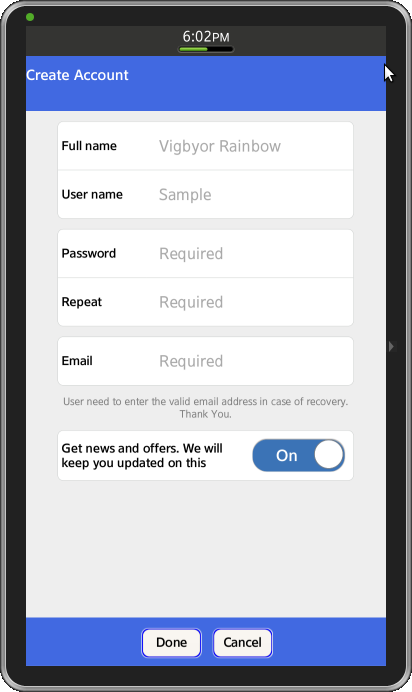
Tizen UX Conversion Tutorial: Long Form Tutorial - Part 1
PUBLISHED
Overview
This article is part one of a two part series that demostrates the Long Form UI pattern. Then in part 2, the UI is modified to follow the Tizen UX Guidelines.
The Long Form UI pattern may be used to enter many types of data. However, for the purposes of this article, we will use it to create an account profile.
Pre-conditions
To develop Long Form UI 'jquery.js' and 'web-ui-fw.js' must be included inside 'script' tag of HTML 'head'.
<ul>
  <li>src="tizen-web-ui-fw/latest/js/jquery.js"</li>
  <li>src="tizen-web-ui-fw/latest/js/tizen-web-ui-fw-libs.js"</li>
  <li>src="tizen-web-ui-fw/latest/js/tizen-web-ui-fw.js" data-framework-theme="tizen-white" data-framework-viewport-scale="false"</li>
</ul>
Long Form HTML Page
There are three section in HTML page:
<ul>
  <li><a>Header</a></li>
  <li><a>Content</a></li>
  <li><a>Footer</a></li>
</ul>
Create Header on the top of the page with fixed position. Define title of the screen. Apply style for header in css. Create buttons and apply style for each button.
<div data-role="header" data-position="fixed" class="ui-hdr" id="hdr">
  <table class="ui-hdr-table" cellpadding="0" cellspacing="0">
    <tr>
      <td class="ui-hdr-title-col"><span class="ui-hdr-title-text">Create Account</span></td>
    </tr>
  </table>
</div>
In the content section, create a form and place the table elements in it. Then create an input field title and an input field area inside the row element. Set 'placeholder' for each input field. Define the CSS styles for the table and rows. The code below is used for a creating table, the input field title and input fields on the screen.
<table class="ui-lf-table-main" cellpadding="0" cellspacing="0">
  <tr>
    <td class="ui-lf-if-title">Full name</td>
    <td class="ui-lf-if-textarea">
    <input type="text" class="ui-lf-if-text" name="name" id="name1" placeholder="Vigbyor Rainbow" />
    </td>
  </tr>
  <tr>
    <td class="ui-lf-if-title">User name</td>
    <td class="ui-lf-if-textarea">
    <input type="text" class="ui-lf-if-text" name="name" id="name2" placeholder="Sample" />
    </td>
  </tr>
</table>
Add paragraph (note text) on the screen.
<div class="ui-lf-note-text">
  <p>User needs to enter a valid email address for recovery. Thank You.>/p>
</div>
Create a toggle switch title and a toggle switch in the bottom part of the screen (content section). The toggle switch widget shows a 2-state switch on the screen. Set The default value is 'On'. For toggle switch, define style in css. Below code is used to add a toggle switch widget in the application.
<table class="ui-lf-table-main" cellpadding="0" cellspacing="0">
  <tr>
    <td class="ui-lf-ts-title">Get news and offers. We will keep you updated on this</td>
    <td class="ui-lf-ts-area"><div id="switch-1" class="ui-lf-ts-main"
    data-role="toggleswitch" data-textoff="Off"></div></td>
  </tr>
</table>
To create Footer on screen, use the following code:
<div data-role="footer" data-position="fixed" class="ui-ftr"id="ftr">
  <table class="ui-ftr-table" cellpadding="0" cellspacing="0">
    <tr>
      <td class="ui-ftr-btn-col"><div data-role="button"
      class="ui-ftr-btn"  id="ui-ftr-btn">Done</div></td>
      <td class="ui-ftr-btn-col"><div data-role="button"
      class="ui-ftr-btn1" id="ui-ftr-btn">Cancel</div></td>
    </tr>
  </table>
</div>
Long Form CSS file
Define the style for 'Body' in CSS as shown below:
body{
	overflow:hidden;
}
The code below is used to apply a linear-gradient to the header and footer:
#hdr{
	background-image: -webkit-gradient(
	linear,
	right top,
	left bottom,
	color-stop(0.5, rgb(74,115,217)),
	color-stop(0.5, rgb(74,115,217)));
}

#ftr{
	background-image: -webkit-gradient(
	linear,
	right top,
	left bottom,
	color-stop(0.5, rgb(74,115,217)),
	color-stop(0.5, rgb(74,115,217)));
}
Create the styles for the header. The user can set the title of the application. The style is defined in CSS as shown below:
.ui-hdr-table{
        width:100%;
	table-layout: fixed;
}

.ui-hdr-title-col {
	width:60%;
}

.ui-hdr-title-text {
	text-align: center;
	vertical-align: middle;
	font-size:36px;
	font-weight:bold;
}

.ui-hdr-table td {
	display: inline-block;
	overflow: hidden;
	white-space: nowrap;
        text-overflow: ellipsis;
	text-align: center;
}
The code below is used to set margins, the background, position, border and border radius and font for input field table:
.ui-lf-table-main{
	width:86%;
	background:#FFF;
	border:1px solid rgb(190, 194, 192);
	border-radius:15px;
	margin-left:7%;
	margin-right:7%;
	margin-top:3%;
	font-family:Georgia, "Times New Roman", Times, serif;
}
Style can be applied to divide table (as a divider) as shown below:
.ui-lf-table-main tr:not(:last-child) td{
	border-bottom: 1px solid rgb(190, 194, 192);
}
The code below is used to set the style to input field title:
.ui-lf-if-title{
	width:30%;
	padding:10px 10px;
	text-align: left;
	color:black;
	vertical-align: middle;
	font-weight: bold;
	font-family:Arial, Helvetica, sans-serif;
	font-size:26px;
}
Below code is used to set the style for input elements(text area and text) in css:
.ui-lf-if-textarea{
	padding:15px 15px;
	width:70%;
}

.ui-lf-if-text{
	border: 1px double #FFFFFF;
	background:#FFF;
	vertical-align: middle;
	color:black;
	min-width:90%;
	horizantal-align:center;
}
Define style for paragraph(Note)in css as shown below:
.ui-lf-note-text {
	width:86%;
	border-radius:15px;
	margin-left:7%;
	margin-right:7%;
	margin-top:3%;
	font-family:Georgia, "Times New Roman", Times, serif;
	color: grey;
	font-size: 20px;
	text-align: center;
}
Set horizontal and vertical alignment in Toggle Switch table:
.ui-lf-ts-main{
	vertical-align: middle;
	horizantal-align:center;
}
Set the title of the toggle table:
.ui-lf-ts-title{
	width:80%;
	padding:10px 10px;
	text-align: left;
	color:black;
	vertical-align: middle;
	font-weight: bold;
	font-family:Arial, Helvetica, sans-serif;
	font-size:26px;
}
Create the style for toggle switch:
.ui-lf-ts-area{
	padding:10px 10px;
	width:20%;
 }
Create style for footer (bottons):
.ui-ftr-table{
	width:100%;
	table-layout: fixed;
}
.ui-ftr-btn-col {
	width:16%;
	padding: 2%;

}
.ui-ftr-btn {

	border-radius: 8px;
	width:100%;
}
.ui-ftr-btn1 {

	border-radius: 8px;
	width:100%;
}
#ui-ftr-btn{
	background:blue;
	font-weight:bold;
}

.ui-ftr-table td {
	display: inline-block;
	overflow: hidden;
	white-space: nowrap;
    text-overflow: ellipsis;
	text-align: center;
}
Screenshots

