Developing Tizen Web Applications with Google Web Toolkit (GWT)
PUBLISHED
关于本文
本文解释如何使用Google Web Toolkit (后面记为GWT) 开发Tizen web 应用程序。 本文主要放在工作环境任务上,比如用GWT编译一个应用,将其打包成为一个Tizen web app .wgt文件,并安装到Tizen模拟器或者设备上。 本文不是一个GWT编程指南。 然而这也包含一个示例应用程序,来向你演示一个工作的例子。 这个示例应用程序不会深入讨论。 只会解释很少的明显的部分,且不是典型的GWT结构。
重要 !
本文针对于Tizen版本2.1到2.2和GWT2.5.1版本。 对于该软件之前或之后的版本可能没用。
目标读者
文章针对对开发Tizen web应用程序感兴趣的GWT开发者,以及对学习一个新的工具有兴趣的Tizen Web App开发者。
写给Tizen Web App开发者的前言
简短地说,GWT是一个Java到JavaScript的交叉编译器。 (实际上,它也是一个框架)。 在某种程度上甚至是一个服务端的框架,但是在交叉编译器方面,它在某种意义上在市场上更独特。
要开始在GWT上工作,至少要知道Java编程语言的基本知识。 然而,如果你是一个有经验的JavaScript开发者,并且在Java编程方面并没有先前的经验,GWT可以是一个开始学习Java的理想工具。 GWT并不需要你知道存在于Java世界中广阔的库和专业知识。 你所需要知道的只不过是简单的Java语言(如果你也计划云开发GWT服务端),和熟悉Servlet API手册。 了解JavaScript知识和web开发相关问题,对于GWT的开发有很大帮助。
你可能会奇怪为什么你会需要这样的一个交叉编译器。 首先,看一眼GWT源代码后,和相同的JavaScript代码比起来,可能看起来相当啰嗦。 然而,由GWT编译器所生成的JavaScript有差不多的大小,并且通常比手写的JavaScript代码运行得更快。 生成可与你手写相比拟的代码,当然不足以成为使用一个交叉编译器的原因。
那为什么要使用GWT呢?答案有关于管理能力。 JavaScript是一门灵活强大的脚本语言,但是重构大型的JavaScript工程(特别是由一个大型的或频繁轮换其成员的团队所开发的工程)是很难的,而且容易产生差错。 因此,当需要重构或支持团队协作的时候,Java编程语言和可以由Java开发者使用的开发工具真的很强大。 在大型工程中,GWT可以平衡产出,并减少大量错误,这些错误可以由一个脚本语言像JavaScript那样简单地检查出来。 然而,在小型工程中,GWT通常是一个无用的负担。
需求的软件
为了用GWT创建一个Tizen web应用程序,你需要在你的电脑上安装Tizen SDK(基于Eclipse的IDE一起发售)和GWT SDK。 你也将使用Apache Ant编译工具(打包在Tizen IDE中)。
Tizen SDK
GWK应用程序可以被打包,并用Tizen命令行工具安装,或者从内置的Ant脚本手动安装。 然而,由于只可能从Tizen IDE(至少对于SDK的当前版本)来为Tizen web应用程序创建一个签名,因此你也会需要安装IDE(不只是命令行工具和系统镜像)。 安装向导所建议的典型安装即足够了。 为了用IDE安装Tizen SDK:
- 从https://developer.tizen.org/downloads/tizen-sdk下载Tizen安装管理器
- 按照安装向导,在Configure界面上,在Install Type中选择Typical 。 点击Next按钮到Install界面。
- 提供你选择的安装路径。 (当用Apache Ant打包和布置Tizen应用程序的时候,你会需要这个路径。 如果你喜欢命令行而不喜欢Ant脚本的话,传给Tizen命令行工具的路径可由安装向导附加到PATH环境变量。) 点击Next按钮完成安装。
GWT SDK
GWT SDK 可以被下载和安装成Eclipse Goodle Plugin的一部分,或者安装成一个单独的命令行工具。 即使你决定为Eclipse(更方便)使用Google Plugin,你仍然可以使用命令行工具(这种情况下,GWT SDK可以在这样的路径下找到:<TIZEN_SDK_PATH>/ide/plugins/com.google.gwt.eclipse.sdkbundle_x.x.x/gwt-x.x.x, 这里x.x.x代表GWT的版本)。
为了Eclipse(建议) 用Google Plugin安装GWT SDK
- 在 Tizen IDE顶部菜单中选择Help > Install New Software...
- 在web浏览器中,跳转到https://developers.google.com/eclipse/docs/download,并为Eclipse Indigo版本复制URL(Tizen IDE 版本2.1和2.2是基于Eclipse Indigo)。
- 为第二点中复制的URL添加新的仓库。 从列举的组件中至少为了Eclipse(需要)选择Google Plugin,以及SDK's > Google Web Toolkit SDK x.x.x。
安装独立的GWT SDK
要安装GWT SDK,以不用Eclipse进行开发:
- 跳到https://developers.google.com/web-toolkit/download.
- 选择Download GWT SDK按钮(在网站底部)。
- 解压到你选择的目录。
- 为了方便,你可能想要将这个目录加到PATH环境变量。
Apache Ant
在你已经安装了基于Eclipse的Tizen IDE到你的电脑后,你就不必须要单独安装Ant了。 IDE包含Apache Ant作为其插件。 它可以在如下路径找到: <TIZEN_SDK_PATH>/ide/plugins/org.apache.ant_1.8.3.v20120321-1730/bin. 如果你喜欢从命令行操作Ant(不是从Eclipse的Ant视图),将这个文件夹添加到你的系统PATH变量。
用GWT为Tizen Web App开发准备环境
Tizen SDK所绑定的IDE不允许你武断地组织你的web应用程序工程的结构。 也许这在以后会改变,但是现在看起来,用GWT为写一个Tizen web应用程序的一个自然的起点,是一个平常的GWT工程。 尽管在这篇文章后面你会看到一个示例应用程序工程导入到IDE,下一节会讨论如何准备一个模板代码,使得我们可以容易地开始Tizen GWT工程。
重要 !
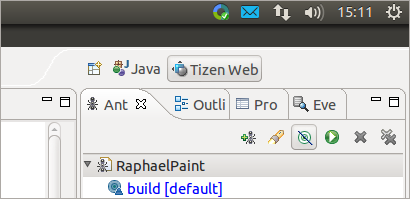
在创建一个GWT工程之前,切换你的IDE的工作视图到"Java Perspective"(Tizen IDE默认是"Tizen Perspective")。 切换视图的图标应该在IDE窗口的右上角落里。 如果Java Perspective按钮看不见,则点击Open Perspective图标,它在所有可看见的"perspective buttons"(见下图)的左边。
创建一个GWT工程
如果你是一个有经验的GWT开发者,就跳过这一节,直接看Tizen的打包GWT应用程序章节。
GWT工程可以通过命令行工具或者从IDE(用安装的Eclipse Google插件)来安装。
在基于Eclipse的IDE中创建一个GWT工程
- 选择 File > New > Project... 这会打开一个向导选择弹出窗口。
- 在向导选择弹出窗口中,选择Google > Web Application Project 向导。
- 填写工程名字和包。
- 反选Use Google App Engine,并确保Use Google Web Toolkit选项已经选上。
- 反选Generate project sample code (Generating sample code 在本节的后面讨论)。
- 点击Finish按钮。
从命令行创建一个GWT工程
- 确保你解包GWT的目录在PATH环境变量中,或者导航到这个目录。 (如果你已经用Eclipse插件安装了GWT,则它是 <TIZEN_SDK_PATH>/ide/plugins/com.google.gwt.eclipse.sdkbundle_x.x.x/gwt-x.x.x)。
- 在类Unix系统中,确保webAppCreator可执行,或者如果不是可执行权限的话,运行chmod u+x webAppCreator。
- 打开系统控制台,并敲:
webAppCreator -out ./MyAppName org.my.package.MyAppName -templates ant,eclipse
这会为工程产生目录结构和Ant编译文件。 如果你忽略了-template选项,那么它会使用sample,ant,eclipse,readme模板。 该示例模板表示webAppCreator会产生示例代码。 产生示例代码会在这节后面进行讨论。 readme模板简单地添加README.txt文件(如果这是你第一次写GWT应用程序,你可以使用它)。
生成的GWT工程看起来像一个典型的Eclipse动态Web应用程序工程。 它有java源代码的/src目录和/war,/war里面有WEB-INF子目录和web.xml文件。 这是因为事实上GWT应用程序是一个Java Servlet web应用程序,而且/war文件夹可以被应用到任何标准的servlet容器。 在/war里面也有从GWT源代码编译的JavaScript输出文件,因此他们是web应用程序的一部分。
GWT不仅是一个客户端框架,也包含一些特定的servlet类(为了RPC沟通)。 假设你想要开发一个web应用程序,它用AJAX与一个服务端应用进行交互。 你要开发两端的程序-客户端和服务端。 如果你决定在服务端使用Java,并在客户端使用交叉编译的GWT Java,则GWT会额外地提供给你一些好处。 使用GWT-RPC(或者一个更新的RequestFactory)作为通信层,你可以在客户和服务源之间分享Java代码。 GWT-RPC和RequestFactory是建立在HTTP-AJAX通信的层级,两者在客户端和服务端都有。 (当然,如果你无法控制服务应用程序的话,你仍然可以用GWT开发一个"normal" AJAX客户端web应用程序)。
当创建一个新的工程时,Eclipse插件和命令行工具都允许你生成示例代码。 生成的示例代码也会包含服务端的类。 如果你不想使用GWT-RPC或者RequestFactory,也不想在同样的工程中编译服务端应用程序的话,只需要将它们移除。 如果你是有一点经验的GWT开发者(或者在你成为这样的开发者之后),你可能不喜欢在工程创建的时候生成示例代码。
重要 !
对使用GWT编译Tizen web 应用程序来说,我们并不鼓励创建一个GWT工程的时候就生成示例代码-请参考"启动工具"章节获取更多解释。
编译一个GWT工程
一个GWT工程包含客户端应用程序的Java源文件,而且对于服务端应用程序的Java源文件,可能有,也可能没有。 理解这两者是如何编译的是很重要的事。
- 客户端的Java源文件被交叉编译成JavaScript,并移动到/war/<MODULE_NAME> 文件夹。
- 服务端的Java源文件被交叉编译成"normal" Java类,并移动到/war/WEB-INF/classes文件夹。
用Ant编译
当你用带有ant模板的webAppCreator创建你的工程时,它会为你生成合适的Ant编译文件。 如果你这么做的话,在终端输入你的工程的ant类型的根目录:
ant gwtc
这会编译客户端代码和服务端代码两者(Ant的gwtc目标依赖于在同样的编译文件中定义的javac目标)。 要在控制台打包你的服务端代码成为一个WAR应用程序类型,则:
ant war
提示!
如果之前没有用过Ant,你可能不知道你会解除Ant任务,在这些情况下会发生,不仅是从命令行,而且也可能是从Ecipse的Ant View内部(这里你简单地双击任务就会将其解除)。
要在基于Eclipse的Tizen IDE中打开Ant view,就要从顶部菜单中选择Window > Show View > Other...,这会显示出Show View对话框,这里在新打开的窗口中选择Ant > Ant。
在基于Eclipse的IDE中编译
Eclipse Google Plugin单独地编译客户端和服务端的代码。
要在Eclipse IDE中编译客户端代码,则在Eclipse的工程导航视力中右击GWT工程,并从上下文菜单中选择Google > GWT Compile。
编译服务端的代码并打包到WAR文件的事情,就像任何其他的Java Web应用程序那样完成了,然而许多开发者喜欢打开ant编译文件。
为Tizen打包GWT应用程序
Tizen web应用程序是根据W3C Widget Packaging和XML配置指导(请参考 http://www.w3.org/TR/widgets/)来打包的。 本质上来说,他们是JavaScript和HTML5应用程序用一个配置文件打包在一起的,在一个单独的ZIP文档中(以.wgt作为扩展)。 Tizen web app配置文件必须被放在.wgt文档的根目录,且名字是config.xml。 文件的结构在后面进行描述。
由于前面已经说过GWT工程包含一个/war文件夹,它有一个"standard" web应用程序的结构。 一个web应用程序包含静态文件(都是由用户生成和创建)和“动态”文件。 “动态”文件是servlets,以及其他编译的放置在/war/WEB-INF目录里面的Java类,以及JSP文件,这些文件可能分散在/war文件夹及其子文件夹的周围。
为了从/war目录(带有GWT编译的JavaScript)创建一个Tizen web app文件,你只需要简单地以一个.wgt文件来创建ZIP文档:
- 另外包含一个config.xml文件,
- 排除动态文件(比如/WEB-INF子目录和JSP文件,如果有的话)。
“启动工具”
GWT和工程的Tizen web应用程序方面需要大量的模板代码。 但不幸的是,你不能指望靠GWT和Tizen SDK提供的工具所生成的样例代码,因为他们互相对彼此都完全不了解。 由于这个原因,本文一起附带了一个简单的“启动工具”。 这个工具是一个可执行的JAR文件tizengwt.jar。 在模板代码之后,它也创建一个Ant编译文件。
当然,你也可以手动创建所有这些文件,或者用GWT webAppCreator生成的样例代码,然后修改它们,以便“让它们知道”你已经手动添加的特定的Tizen文件。 这组生成的文件提供一个好的关于需要什么的视角。
工具的源代码在本文中也发布出来。 你可以观察它是如何工作的,或者按自己的需要来调整它,或者为Tizen SDK或GWT SDK的未来版本来调整它。 然而,可将其看成一种以教学为目的帮助工具,而不是一种成品软件。
让我们来看看它是如何工作的。
- 在前面的章节中已经讨论过用Eclipse或webAppCreator(但不产生样例代码!)创建一个GWT工程。
- 将本文发布的tizengwt.jar文件复制到新创建的工程根目录里面。
- 在控制台中运行:
java -jar tizengwt.jar
- 你要提供模块的名字。 如果你已经用webAppCreator命令行工具创建你的GWT工程,则模块名字应该就是提供给那个工具的名字。 如果你已经用Eclipse插件创建了你的GWT工程,则这模块名字由<package_name>.<project_name>(你已经在工程向导中提供过的)所组成。
D:\TizenWorkspace\Test>java -jar tizengwt.jar
GWT module name:
com.test.Test
Created file: D:\TizenWorkspace\Test\build.properties
Created file: D:\TizenWorkspace\Test\build.xml
Created file: D:\TizenWorkspace\Test\config.xml
Created file: D:\TizenWorkspace\Test\src\com\test\client\Test.java
Created file: D:\TizenWorkspace\Test\src\com\test\Test.gwt.xml
Created file: D:\TizenWorkspace\Test\war\index.html
Created file: D:\TizenWorkspace\Test\war\icon.png
假设所提供的模块名字是com.test.Test,你应该会在"console"窗口输出中看到如上面展示的那样。
- 不要将tizengwt.jar从它的位置上移除,因为它也包含Ant任务,而Ant任务由所生成的Ant编译文件使用。
为编译一个Tizen GWT web应用程序有一个好的起点。 让我们仔细看看生成的文件。
编译属性文件-/build.properties
这个文件包含从生成的Ant编译文件中提取出来的属性信息。 属性和本地文件系统相关。 如果工程要在使用版本控制系统的团队成员间分享的话,这个文件就不应该被加到仓库里面。 打开这个文件,并提供匹配你的文件系统的数值。
#Path to Tizen SDK on your computer
tizen.sdk=/path/to/tizen-sdk

#path to GWT SDK
#If you installed GWT SDK with Google Plugin for Eclipse from within
#Tizen flavoured Eclispe IDE you can leave the default value untouched
gwt.sdk=${tizen.sdk}/ide/plugins/com.google.gwt.eclipse.sdkbundle_2.5.1/gwt-2.5.1

#Profile name and path to profiles.xml generated in Tizen IDE
#profiles.xml file is stored in #.metadata/.plugins/org.tizen.common.sign/profiles.xml
#subdirectory of the Tizen IDE workspace
tizen.sign.profile=profilename:/path/to/tizen-ide-workspace/.metadata/.plugins/org.tizen.common.sign/profiles.xml
现在这里只有三种属性。 前两个的名字是自定义的。 最后一个会在准备签名文档章节中进行介绍。
编译文件-/build.xml
这是一个由webAppCreator生成文件的修改版本,webAppCreator用-template ant触发。 它包含为编译GWT应用程序而使用的Ant目标。 所有在编译一个GWT工程章节中描述的目标文件不变。
另外,这个文件定义了Ant目标文件,这些目标文件是为了在Tizen web应用程序中工作准备的。 这些目标文件会在后面打包和安装章节中描述。
默认的编译目标也做了小的修改,以包含Tizen特定的目标文件。
Tizen 配置文件-/config.xml
这是一个已经提及到的Tizen web app配置文件。 所生成的内容如下。 你可以认为它是一个配置文件的最小版本。
<widget xmlns:tizen="http://tizen.org/ns/widgets" xmlns="http://www.w3.org/ns/widgets" id="http://test.com/Test" version="1.0.0" viewmodes="maximized">
    <tizen:application id="TfHKObV1Sm.Test" package="TfHKObV1Sm" required_version="2.1"/>
	<content src="index.html"/>
	<icon src="icon.png"/>
	<name>Test</name>
</widget>
tizen:application节点的包属性是一个唯一的十个字符长度的字母和数字的字符串,它代表在一个Tizen设备上的应用程序。 这个节点的id属性When creating a Tizen web application project with an IDE wizard, values for these attributes are generated automatically for you.All other settings in this file seem to be self-descriptive.
GWT Module descriptor - /src/com/test/Test.gwt.xml
This is a GWT module descriptor.It contains a meaningful comment for each entry.It is usually a point from which you start browsing a GWT module sources.
<?xml version="1.0" encoding="UTF-8"?>
<!DOCTYPE module PUBLIC "-//Google Inc.//DTD Google Web Toolkit 2.5.1//EN" "http://google-web-toolkit.googlecode.com/svn/tags/2.5.1/distro-source/core/src/gwt-module.dtd">
<module rename-to="test">

	<!-- GWT modules on which this module depends -->
	<inherits name="com.google.gwt.user.User" />

	<!-- the class form which all starts -->
	<entry-point class="com.test.client.Test"/>

	<!-- Tizen web environment behaves like chrome browser we can ignore
		other browsers -->
	<set-property name="user.agent" value="safari"/>

	<!-- If you add other compile properties it makes the output is not splitted
		into multiple files -->
	<collapse-all-properties />

	<!-- comment out the sso linker setting when debugging in chrome -->
	<add-linker name="sso" />
</module>
The most important is the entry-point node which points at the module’s entry point class.
GWT Entry Point Class - /src/com/test/client/Test.java
The entry point to the GWT application is the class pointed by the module descriptor file.
You may wonder why it is in .client subpackage as you have not specified such package anywhere.The .client subpackage in the module’s package (with its subpackages) is by convention the place where client side Java sources are placed.You can overwrite this location in module’s descriptor (however it must be a subpackage of the module’s package or the very module’s package itself).
By convention the “server side” sources are in .server subpackage and the sources used by both the server and the client are in .shared subpackage (these names can be overridden, too).But the generated boilerplate code structure contains only a .client package.
The class declared as module’s entry point must conform only one requirement.It must implement com.google.gwt.core.client.EntryPoint interface.The module’s entry point class can have any name and location inside the “client side” package.However the class generated automatically by the “bootstrapper tool” has the same name as the module name and is placed directly in the .client package.The skeleton of this class generated by the “bootstrapper tool” looks as presented below.
package com.test.client;

import com.google.gwt.core.client.EntryPoint;

public class Test implements EntryPoint {

	@Override
	public void onModuleLoad() {
		//TODO:
	}
}
The onModuleLoad() method is called after two conditions are fulfilled: the module is loaded on the client and “DOM Ready” event is fired.
Start Page - /war/index.html
This is a start page of a Tizen web application.The name is defined in the Tizen config file.The file generated by the tizengwt.jar is a blank HTML page with standard code for inclusion of compiled GWT module.
<!-- Include a history iframe to enable full GWT history support -->
<!-- (the id must be exactly as shown)                           -->
<iframe src="javascript:''" id="__gwt_historyFrame"
style="width:0;height:0;border:0"></iframe>

<script type="text/javascript" src="test/test.nocache.js"></script>
A path to generated GWT module is based on the rename-to attribute of the root node of the GWT module descriptor XML file.This is where the GWT compiler moves the resulting JavaScript code (inside the /war directory).
Application Icon – /war/icon.png
The icon image file (the name of which is specified in the config.xml) which serves as application’s icon when it is installed on a Tizen device.This is a default icon exactly the same as in project generated with the IDE wizard.
Preparing Signing Profile
Starting from version 2.1 all Tizen web application must be signed before installation.
Information on the Certificate Generator command line tool as well as information on registering Author Certificates in IDE can be found in the Tizen developer guide at the URLs https://developer.tizen.org/help/index.jsp?topic=%2Forg.tizen.gettingstarted%2Fhtml%2Fdev_env%2Fcertificate_generator.htm, and https://developer.tizen.org/help/topic/org.tizen.gettingstarted/html/dev_env/setting_author_certificate.htm respectively.As this topic can be a bit confusing for a newcomer, a short how-to guide is presented below.
The first step is to generate pksc12 file storing private key and certificate.You do this with use of Certificate Generator command line tool.In the console enter the <TIZEN_SDK_PATH>\tools\certificate-generator folder and type: ./certificate-generator.sh or ./certificate-generator.bat (depending on your OS).Then provide answers to the questions asked by the tool.The output file is generated the working directory and has .p12 extension.(In Tizen SDK version 2.2.1 you may also generate this certificate from within Tizen IDE – see next paragraph).
After you have created a pksc12 file you must register your certificate in the Tizen IDE.In order to register author’s certificate in the Tizen IDE fowllow the instructions below:
- Open the Window > Preferences entry in the main menu of the Tizen IDE.Then on the Preferences page select Tizen SDK > Secure Profiles.
- Click Add button in the Profiles section to create a new profile.
- In the Author Certificate section click the Edit button (or, if you are using 2.1 version of IDE, click on an input field under the Certificate path label).This will open a file chooser dialog to help you to provide a path to generated pksc12 file.In an input field under the Password label enter the password which you have defined when creating the pksc12 file with the certificate-generator tool.
If you are using 2.2.1 version of IDE, you will find here also the Generate button, which opens an IDE form window to interact with the certificate-generator tool.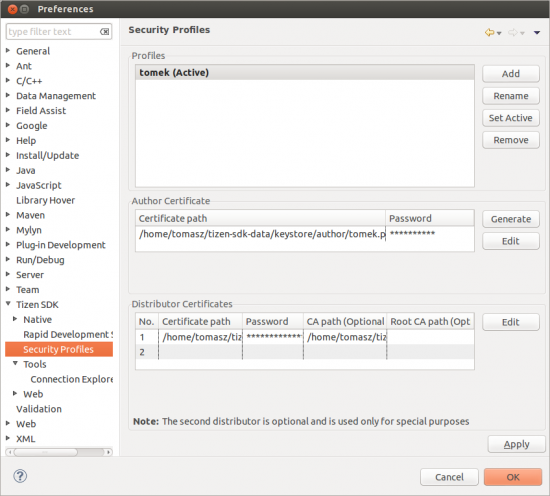
- Now a profiles.xml file is generated in a hidden directory in your workspace.The path is <YOUR_WORKSPACE>/.metadata/.plugins/org.tizen.common.sign/profiles.xml.
After you have generated the signing profile open the build.properties file (which was generated with the “Bootstrapping Tool”) and update the tizen.sign.profile property accordingly.
Packaging and Installation
After you have created your GWT project, enchanced it with tizengwt.jar tool and generated your signing profile you can exercise Tizen specific commands either called from Ant or directly from command line.Let’s start with Ant.
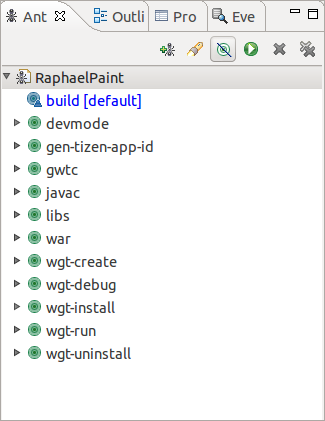
The default Ant target is called when you type ant with no arguments.In the build file generated with the “bootstrapping tool” the default target calls three other targets sequentially: gwtc, war, and wgt-create.The first two you have already encountered in the Compiling a GWT Project section, the last one is described below.
To sign and package your GWT client side code as .wgt file with Ant:
- Ensure you have compiled your GWT client side sources as described in Compiling a GWT Project section.
- Enter the root folder of your project and type in console:
ant wgt-create
This should create a widget with name <ENTRY_POINT_NAME>.wgt in the (You may however tune the build file to provide the name of your choice).
To install your application on Tizen emulator or device with Ant:
- Connect the Tizen device to your computer or start the Tizen emulator.
- Enter the root folder of your project and type in the console window:
ant wgt-install
This target calls wgt-create and wgt-unistall targets before actually installing the application.For this reason the /war folder should contain valid and up-to-date GWT compiled JavaScript.
To uninstall your application from Tizen emulator or device with Ant:
- Ensure a proper device is connected or a proper emulator is started.
- Enter the root folder of your project and type in the console window:
ant wgt-uninstall
To generate a new Tizen package id and Tizen application id with Ant:
- Enter the root folder of your project and type in console:
ant gen-tizen-app-id
If you don’t like Ant you may use Tizen command line tools.However in that case you will have to type widget id and path each time manually (and packaging file will imply some extra manual work).
Ant build files are really comfortable when they are fired from Eclipse’s Ant view.Hint: In order to open Ant View in the IDE select from main menu Window > Show View > Ant.If the Ant entry is not visible select Window > Show View > Other… and then select An.
After you have compiled the GWT code, in order to create a signed .wgt file from command line you will use web-signing and web-packaging tools.A GWT project includes also source files, built Java classes and other files intended for use on the server side.You do not want to sign these files neither to include them into a .wgt file.For this reason you will need to create a temporary folder including only files from the /war folder intended for packaging, as well as the config.xml file before firing these tools.Follow the wgt-create Ant target code to see the suggested workflow.
<target name="wgt-create" description="Creates wgt file">
	<delete file="${tizen.wgt}"></delete>
Delete old .wgt file if exists.
	<mkdir dir="${tizen.wgt.tmp.dir}"/>
	<copy todir="${tizen.wgt.tmp.dir}">
		<fileset dir="./war" excludes="WEB-INF/**" />
		<fileset file="./config.xml" />
	</copy>
Create a temporary folder and copy static web files from the /war folder and a config file into it.
	<exec executable="${tizen.sdk.tools}/web-signing${bat}"
		dir="${tizen.wgt.tmp.dir}">
		<arg value="-n" />
		<arg value="--profile" />
		<arg value="${tizen.sign.profile}" />
	</exec>
Run web-signing --profile profilename:path/to/profiles.xml from command line.
	<exec executable="${tizen.sdk.tools}/web-packaging${bat}">
		<arg value="-n" />
		<arg value="${tizen.wgt}" />
		<arg value="${tizen.wgt.tmp.dir}" />
	</exec>
Run web-packaging /path/to/Widget.wgt /path/to/temporaryFolder from command line.
	<delete dir="${tizen.wgt.tmp.dir}" />
</target>
Finally delete the temporary folder.
To install your application on Tizen emulator or device with Tizen command line tools:
- Connect the Tizen device to your computer or start the Tizen emulator.
- Enter the /war folder in your project and type in the console window:
web-install --widget /path/to/Widget.wgt
Unlike the corresponding Ant it does not fire any other tasks.
To uninstall your application from Tizen emulator or device with Tizen command line tools:
- Ensure a proper device is connected or a proper emulator is started.
- Enter the /war folder in your project and type in the console window:
web-uninstall --id <ID_FROM_config.xml>
Generating a new package and application ids on demand cannot be achieved with Tizen command line tools.
Debugging in Google Chrome Web Browser
The GWT application can not be debugged in the Tizen emulator in meaning of Java Platform Debugger.
However when your application runs in a Chrome Browser you can debug it with a “normal Java debugger” from within the Eclipse IDE.(The Chrome browser is also used by Mobile JavaScript Developers as it is closely related to mobile webkits).In order to debug your application in Chrome Browser:
- Comment out the linker setting the module’s descriptor file:
<!-- comment out the sso linker setting when debugging in chrome -->
<!-- <add-linker name=”sso” /> -->
- Recompile the client side code.
- Set breakpoints as you would normally in a Java application.
- Right click the project in the Project Explorer window and from the main menu select Debug as > Web Application.This will start the GWT debugger.
- Open chrome browser and paste the URL copied from the GWT debugger’s window.
- If you run the debugger for the GWT debugger for the firs time in chrome it will monit you to install proper plugin.
The Sample Application
The sample application delivered with this article is a clone of RaphaelPaint sample application which is discussed in the article “Working with Raphael JS Library on Tizen” (https://developer.tizen.org/documentation/articles/working-raphael-js-library-on-tizen).Shortly speaking, the application is a playground for drawing simple shapes.For full description of the application’s logic, please refer to the mentioned article.
Only the source code of the very application has been ported to GWT.All dependencies to external JavaScript libraries remain unchanged.(If you wonder how “native” JavaScript can be used from within Java you will find explanation some sections later).Also CSS styles and HTML markup are left unchanged.
Running Sample Application
The directory structure of the project has been created with Google Plugin for Eclipse (without generating sample code and without the AppEngine project facet), then it was “enhanced” with the tizengwt.jar (as described in the “Bootstrapping tool” section).
Open the build.properties file and adjust the tizen.sdk and gwt.sdk properties to match actual paths on your file system.You must also create a signing profile as described in Preparing Signing Profile section and update the tizen.sign.profile property accordingly.
Importing the project into Eclipse based IDE is straightforward and not specific to Tizen or GWT.To do it just select File > Import… from the IDE’s main menu, then on the popping-up window select General > Existing Project into Workspace and follow the wizard.
(Information on how to create a deployable .wgt file and install it on emulator or device has already been provided in the Packaging and Installation section).
The Source Code
GWT Module Descriptor
When you are about to read source code of a GWT module you usually start from its module descriptor file.The GWT module name of the sample application is org.tizen.gwt.sample.raphaelpaint.RaphaelPaint.This means that the module descriptor is called RaphaelPaint.gwt.xml and is placed in org.tizen.gwt.sample.raphaelpaint package.Open it in your editor.This descriptor is almost the same as generated by the earlier mentioned “bootstrapping tool” jar.The only difference is the additional dependency line:
<inherits name="com.google.gwt.i18n.I18N"/>
This means the application depends also on com.google.gwt.i18n.I18N module.This is a standard module provided with the GWT SDK.If you wanted to include a third party GWT module in your module, then, next to declaring the dependency as above, you would need also to put a source JAR file in the java build path.The name attribute of inherits node is the name of the module (which describes the module’s root package and the entrypoint name exactly as our org.tizen.gwt.sample.raphaelpaint.RaphaelPaint).
Tizen Web App Config
The /config.xml file is in turn a “descriptor file” for the Tizen web app.In this sample application it is also not much different from the boilerplate config file generated by the “bootstraper tool” jar.There is only one additional node.
<tizen:setting screen-orientation="portrait" context-menu="enable" background-support="enable" encryption="disable" install-location="auto"/>
These are basic Tizen app settings.You probably will have also requests for Tizen privileges in your application’s config file.For complete list of priviliges please consult Tizen API Reference.
This file is specific to Tizen not GWT, and although it is placed in the Tizen project’s root folder, the wgt-create Ant target copies it into the generated .wgt archive as if it were in the /war folder.
Tizen Web App Start Page
The start page of Tizen web application is an HTML page with a name as specified in the config.xml file.It can be named arbitrally but the default value index.html is used in most cases.This “links” the Tizen part of the project with the compiled GWT code.This file is also based on the file generated by the “bootstrapping tool”.The generated file is an empty page with HTML markup which shows how to attach the compiled GWT module to the client page.Next to generated code the page contains:
- In the head node: link and script nodes to import external javascript files and CSS styles (but not the JavaScript code produced by GWT).
- In the body node: HTML markup copied from the the original RaphaelPaint Tizen Web App and pasted just above the markup for including GWT module.
Java Sources
As mentioned above only the source code of the very application has been ported to GWT, but not the external libraries.In order to help you to compare source codes for both applications, the class names are corresponding to the names of the JavaScript files in the original application.Also the class member fields and methods are named with respect to variable names in the original JavaScript.Although they were slightly modified to conform to Java naming conventions, you can easily identify which part of JavaScript code in the original “native” application corresponds to particular Java method.The GWT Java code also uses enum types to improve maintainability.The enum types are not present in the JavaScript language.
JavaScript Libraries and the JSNI Overlay Types
As you see the .client subpackage has another subpackage named .overlay.This is the package with the “overlay” classes “built over” the native JavaScript libraries used by the module.
Before explaining the overlay types another notion must be introduced: a JSNI – JavaScript Native Interface.JSNI enables GWT developers to incorporate native JavaScript in their GWT Java code.The syntax is based on JNI.
public static final native JQuery jQuery(Element element) /*-{
	return $wnd.$(element);
}-*/;
A native method is prefixed with native keyword and has no Java body (as an abstract method).However there’s one difference to JNI.JSNI method has additionaly its JavaScript source inside a special comment block /*- -*/.For an example open the JQuery class in the .overlay package.
JSNI Overlay type is a class which wraps over an existing JavaScript object and provides an “interface” contract to access its methods and properties from the GWT Java code.JSNI Overlay type class must conform to the following restrictions.
- It has to extend com.google.gwt.core.client.JavaScriptObject.
- All of its non-static methods (both native and non native) must be declared as final or the class itself must be final.
- It must not declare member fields.
- It must have only one, no-arguments constructor.
Almost all classes in the .overlay package are JSNI overlay types.One of these classes the BoundingClientRect (which is concise enough to be quoted as a whole) is presented below to illustrate this topic.
public class BoundingClientRect extends JavaScriptObject {

	public static final native BoundingClientRect get(Element element)/*-{
		return element.getBoundingClientRect();
	}-*/;

	protected BoundingClientRect() {}

	public final native int getTop() /*-{
		return this.top;
	}-*/;

	public final native int getLeft() /*-{
		return this.left;
	}-*/;

	public final native int getBottom() /*-{
		return this.bottom;
	}-*/;

	public final native int getRight() /*-{
		return this.right;
	}-*/;

	public final native int getWidth() /*-{
		return this.width;
	}-*/;

	public final native int getHeight() /*-{
		return this.height;
	}-*/;
}
The GWT compiler inlines calls to methods of JSNI overlay classes, so in the resulting code there is no sign of their existence as if you were using the wrapped original JavaScript objects.
All the overlay types in this sample application, which wrap JavaScript objects from well known libraries as Jquery or Raphael, wrap over only those methods and properties of original objects which are actually used in this sample application.
Dynamic Object Properties
JavaScript developers are accustomed to adding properties or methods to existing object dynamically, while Java requires from an object to conform the contract defined by its class and by implemented interfaces.Porting existing JavaScript code to GWT causes these two attitudes to collide.Of course, you could redesign the whole application in the Java manner.Alternatively you could add a “wildcard” Object field to you class to keep reference to anything.This would work but with that you loose the advantages of strictly typed language.GWT comes with one more solution.
If an object is of class extending com.google.gwt.core.client.JavaScriptObject then underneath it wraps over a real JavaScript object, which, as you know, is dynamic.However from the Java point of view this is hidden under the contract of actual Java class.As all the classes which extend JavaScriptObject are in runtime “wrapped over” existing JavaScript object which from their nature are dynamic and their “interface” can change over the time , it may make sense to cast between them, even if they are not in the same class hierarchy (as long as they have common parent com.google.gwt.core.client.JavaScriptObject).Yes, it may sound tortuously.Looking at some code will be more descriptive.The source code for the draw method of the ShapeDrawer class provides a good illustration.
In the original RaphaelPaint JavaScript application there is a file shapeDrawer.js which includes a snippet of code like below.
elem.attr({
	// Attributes of the element
	"fill" : config.fillColor,
	"stroke" : config.strokeColor
});

// Initial values of applied transforms
elem.translate = [ 0, 0 ];
elem.scale = [ 1, 1 ];
elem.rotate = 0;

// Sets event handlers for moving, drag start and end
elem.drag(transforms.move, transforms.start, transforms.up);
The elem variable keeps a reference to an object returned by one of the Raphael drawing functions.As so it has properties and methods as specified in the library for the “raphael element”.However you cannot say it is of type “raphael element” as it can be modified at any time.And actually it is modified in the above code.Three new properties (translate, scale, rotate) are added to it.The “raphael element” has no idea of them.
The corresponding part in GWT is ShapeDrawer#draw() method.It looks like below.
//...
RaphaelElement element;
switch(tool) {
	case circle:
		element = mPaper.circle(x, y, 30);
		break;
//...
element.attr(RaphaelAttr.FILL, fillColor);
element.attr(RaphaelAttr.STROKE, strokeColor);

element.<JsBag> cast()
	.put(Props.TOOL_NAME, tool.name())
	.put(Props.TRANSLATE_X, 0)
	.put(Props.TRANSLATE_Y, 0)
	.put(Props.SCALE_X, 1)
	.put(Props.SCALE_Y, 1)
	.put(Props.ROTATION, 0);

element.setDragCallback(mTransforms);
Both RaphaelElement and JsBag are descendants of JavaScriptObject and none of them is in class hierarchy of the other.In spite of this the element is casted on JsBag type.The method JavaScriptObject#cast() is only a utility.It looks like below.
@SuppressWarnings("unchecked")
public final <T extends JavaScriptObject> T cast() {
	return (T) this;
}
You could achieve the same easily without this method.
RaphaelElement element;
JsBag jsBag = (JsBag) (JavaScriptObject) element;
The “magic” is not in syntax but in what’s underneath - e.g. native JavaScript.In “normal” Java code a cast operation as above would also cheat the compiler but in runtime it would throw a ClassCastException.
As you know this feature, you can define different “faces” of the JavaScript object as JSNI overlay types and then cast between them when needed.However, when designing the overlay type class keep in mind to handle the case when it is casted on a “bare fresh object”.And sometimes this “handling” may simply mean throwing some specific exception.