Tizen UX Conversion Tutorial: Calculate Form - Part 1
PUBLISHED
Calculate Form
Overview
This article is part one of a two part series that demostrates the Calculate Form UI pattern, implemented in part 1 using jQuery. Then in part 2, the UI is modified to follow the Tizen UX Guidelines.
CalculateForm HTML Page
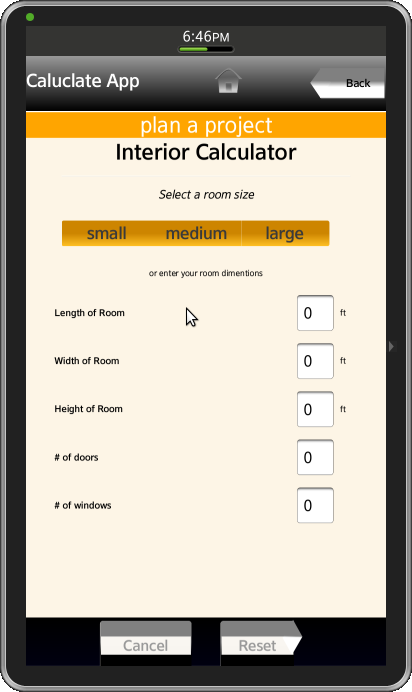
The CalculateForm UI pattern is an web based calculator pattern that calculates data based on user input. In this form, the buttons in the header and the footer are customized and a table view has been created, where the user can enter data, as shown in the screenshot below.
CalculateForm Header
In the application header, a table of one row and three columns created with button, title, and image, as shown in the screenshot below. Here is the html code for the header.
<div data-role="header" id="ui-calc-header" data-position="fixed">
  <table class="ui-hdr-table" cellpadding="0" cellspacing="0">
    <tbody>
      <tr>
        <td class="ui-calc-hdr-title-col">
          <span class="ui-calc-hdr-title-text">Caluclate App</span >
        </td>
        <td class="ui-calc-hdr-btn-col">
          <a data-role="button" id="ui-cal-hdr-right-btn"></a >
        </td>
        <td class="ui-calc-hdr-btn-col">
          <a id="ui-cal-hdr-left-btn" data-role="button">Back</a >
        </td>
      </tr>
    </tbody>
  </table>
</div>
CalculateForm Content
The calculate form content area consists of different titles followed by a tabbed Menu with options like small, medium, large, and a table. There are five rows and three columns with text input fields for user input. The html code for the tabbed menu is shown below:
<div data-role="fieldcontain" class="ui-cal-button>
  <fieldset data-role="controlgroup" data-type="horizontal>
    <input type="radio" name="radio-view-8" id="segment1" value="off" />
    <label class="ui-cal-radiobutton1" id="ui-cal-radiobutton1" for="segment1">small</label>
    <input type="radio" name="radio-view-8" id="segment2" value="off" />
    <label class="ui-cal-radiobutton2" id="ui-cal-radiobutton2" for="segment2">medium</label>
    <input type="radio" name="radio-view-8" id="segment3" value="off" />
    <label class="ui-cal-radiobutton3" id="ui-cal-radiobutton3" for="segment3">large</label>
  </fieldset>
</div>
CalculateForm Footer
To remove the default back button in the footer, set the attribute data-add-back-btn="none" to page element. To create a button with triangle on right, define and apply css, as shown in the code below.
<div data-role="footer" data-position="fixed">
  <div data-role="tabbar" data-type="horizontal" id="ui-cal-ftr">
    <ul>
      <li>
        <a id="ui-calc-footer-buttons1" data-role="button">Cancel</a>
      </li>
      <li>
        <a id="ui-calc-footer-buttons2" data-role="button" class="reset">Reset</a>
      </li>
    </ul>
  </div>
</div>
CalculateForm CSS File
Header Style
The table is created and style has been defined for each row. The css code for a custom button with a triangle arrow on the left is shown below.
#ui-cal-hdr-left-btn {

	position: relative;
	width: 100%;
	border: 0px;
	border-right: none;
	background:-webkit-linear-gradient(grey, grey 43%, white 63%);
	cursor: pointer;
	font-size: 30px;
	font-weight:bold;
	text-align: center;
	vertical-align: middle;
	left: 48px;
	text-overflow:ellipsis;
	border-top-right-radius: 10px;
	border-bottom-right-radius: 10px;
	border-top-left-radius: 0px;
	border-bottom-left-radius: 0px;
	box-shadow: 0 4px 2px -2px grey;
}

#ui-cal-hdr-left-btn:before {
	position: absolute;
	top: 16px;
	left: -22px;
	width: 48px;
	height: 47px;
	-webkit-transform: rotate(-44deg) skewX(-10deg) skewY(-10deg);
	background: -webkit-linear-gradient(-136deg, grey, grey 43%, white 63%, white);
	content: '';
	z-index: 0;
}
Content Table Style
The code for table, title, input field, and the dimensions styles in page content is shown below.
.ui-calc-table-main {
	width: 86%;
	margin-left: 7%;
	margin-right: 7%;
	margin-top: 3%;
	font-family: Georgia, "Times New Roman", Times, serif;
}

.ui-calc-if-title {
	width: 70%;
	padding: 10px 10px;
	text-align: left;
	color: black;
	vertical-align: middle;
	font-weight: bold;
	font-family: Arial, Helvetica, sans-serif;
	font-size: 26px;
}

.ui-calc-if-textarea {
	padding: 15px 15px;
	width: 10%;
	margin-left: 5%;
}

.ui-calc-if-text {
	background: #FFF;
	vertical-align: middle;
	color: black;
	min-width: 100%;
	horizantal-align: center;
	border-radius: 8px;
	box-shadow: inset 0px 11px 8px -10px #111;
}
CalculateForm Footer
To override the default footer color, a separate class has been defined, as shown below, and applied to div element inside the footer.
#ui-cal-ftr {
	height: inherit;
	margin: 0px;
	width: 100%;
	font-weight: bold;
	overflow-x: hidden;
	overflow-y: hidden;
	background-image: -webkit-linear-gradient(top, #000 0%, #001 100%);
	width: 100%;
}
Footer buttons
The css code for footer buttons with or without a triangle arrow is shown below.
#ui-calc-footer-buttons1 {
	height: 60%;
	font-size: 36px;
	margin-top: 2%;
	margin-bottom: 2%;
	margin-left: 8%;
	margin-right: 8%;
	width: 50%;
	border-radius: 10px;
	background-image: -webkit-linear-gradient(grey, grey 43%, black 63%, black);
	box-shadow: 0 4px 2px -2px grey;
	float:right;
}

#ui-calc-footer-buttons2 {
	height: 60%;
	font-size: 36px;
	margin-top: 2%;
	margin-bottom: 2%;
	margin-left: 8%;
	margin-right: 8%;
	width: 40%;
	background: -webkit-linear-gradient(grey, grey 43%, black 63%, black);
	border-top-left-radius: 10px;
	border-bottom-left-radius: 10px;
	border-top-right-radius: 0px;
	border-bottom-right-radius: 0px;
	box-shadow: 0 4px 2px -2px grey;

}

#ui-calc-footer-buttons2:after {
	position: absolute;
	top: 35%;
	right: 0;
	margin: -30px -18px;
	width: 45px;
	height: 57px;

	-webkit-transform: rotate(30deg) skewY(31deg) ;
	background: -webkit-linear-gradient(-40deg, grey, grey 46%, white 50%, white);
	content: '';
	z-index: 0;
	;
}
CalculateForm javascript File
The user can go back by clicking on 'Back' button. The user can also reset the room dimention values as shown below.
$(".reset").bind("click", function() {
    	  $("input[type=text], textarea").val("0");
    	});

    $("#ui-cal-hdr-left-btn").on('click', function(){
        var app = tizen.application.getCurrentApplication();
        app.hide();
});
Screenshots
Below is the screenshot of the CalculateForm View:
