Tizen Native UI Fragmentation
PUBLISHED
Introduction
This article describes how to divide UI view into different fragments. Fragment is a modular section of UI view where you can control a particular UI segment according to your requirements. It represents a portion of user interface where you can put different UI widgets, input events etc.
UI Structure
The UI view of sample app attached with this article mainly use 4 containers. The name of the containers are window, conform, layout and naviframe. Here Window is the root container, Conformant container which is used to set indicator at the top of the screen is placed on Window container, Layout container is placed on Conform container and finally Naviframe container is placed on Layout container. All the UI fragments are placed on Naviframe container. The following figure illustrates UI structure in a tree form:

Figure: UI Structure
Steps to Create Fragment
Step 1: Creating Data Structure
In this tip document, a sample application is developed which consists of several Evas_Object. Here, appdata structure is used to easily manage the UI elements in different UI segments.
typedef struct appdata {
	Evas_Object *win;
	Evas_Object *conform;
	Evas_Object *layout;
	Evas_Object *nf;
	Evas_Object *mainview
} appdata_s;
Step 2: Creating containers Object
To use different container we need to create corresponding container object first.
For window object creation:
ad->win = elm_win_util_standard_add(PACKAGE, PACKAGE);
For Conformant object creation:
ad->conform = elm_conformant_add(ad->win);
For layout object creation:
ad->layout = elm_layout_add(ad->conform);
For naviframe object creation:
ad->nf = elm_naviframe_add(ad->layout);
Step 3: Place UI on Naviframe
To push UI to the top of the naviframe view following API is used
elm_naviframe_item_push(Evas_Object *obj, const char *title_label, Evas_Object *prev_btn, Evas_Object *next_btn, Evas_Object * content, const char *item_style)
Parameters Description:
|
obj |
The naviframe object |
|
title_label |
The label in the title area. |
|
prev_btn |
The button to go to the previous item. If it is NULL, then naviframe will create a back button automatically. |
|
next_btn |
The button to go to the next item. Or It could be just an extra function button. |
|
content |
The main content object. |
|
item_style |
The current item style name. NULL would be default. |
In the sample code, the above API is used with the following parameters:
elm_naviframe_item_push(ad->nf, "UI Fragment", NULL, NULL, ad->mainview, NULL);
Step 4: Creating Fragment
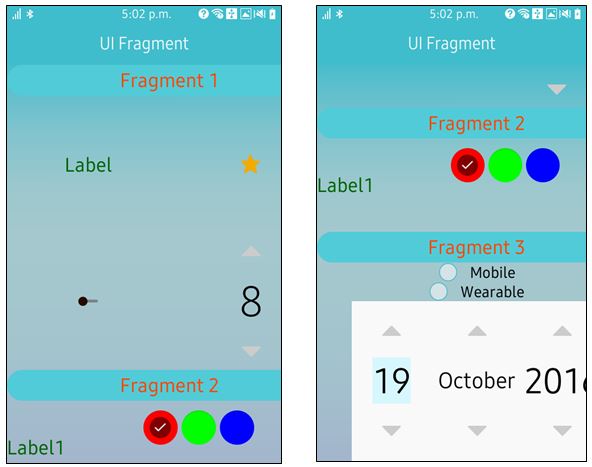
To create fragment, the BOX container concept is used. Content alignment can be set in BOX container equally. The sample app has three fragments. Each of the fragments is a content of Box container. Every newly created fragment is added at the end of box container. It maintains equal alignment which is described in BOX container property.
static Evas_Object*  fragment_UI(appdata_s *ad)
{
	Evas_Object *scroller, *box_full, *table, *fragment_title, *item;

	/* Scroller is used to see all the contents in the UI view if contents goes outside of the UI visible part  */

scroller = elm_scroller_add(ad->win);
	evas_object_size_hint_weight_set(scroller, EVAS_HINT_EXPAND, EVAS_HINT_EXPAND);
	evas_object_size_hint_align_set(scroller, EVAS_HINT_FILL, EVAS_HINT_FILL);
	evas_object_show(scroller);

	/* Parent Box */

box_full = elm_box_add(ad->win);
	elm_box_align_set(box_full, 0,0 );
	evas_object_size_hint_weight_set(box_full, EVAS_HINT_EXPAND, EVAS_HINT_EXPAND);
	elm_object_content_set(scroller, box_full);

	/* Fragment -1 Object*/

	fragment_title = create_fragment_title(box_full, "Fragment 1");
	evas_object_show(fragment_title);
	elm_box_pack_end(box_full, fragment_title);
	table = fragment1(box_full);
	evas_object_show(table);
	elm_box_pack_end(box_full, table); 	// Fragment-1 added at the end of the box

	/* Fragment -2 Object*/

	fragment_title = create_fragment_title(box_full, "Fragment 2");
	evas_object_show(fragment_title);
	elm_box_pack_end(box_full, fragment_title);
	item = fragment2(box_full);
	evas_object_show(item);
	elm_box_pack_end(box_full, item); 	// Fragment-2 added at the end of the box


/* Fragment -3 Object*/

fragment_title = create_fragment_title(box_full, "Fragment 3");
	evas_object_show(fragment_title);
	elm_box_pack_end(box_full, fragment_title);
	item = fragment3(box_full);
	evas_object_show(item);
	elm_box_pack_end(box_full, item);	// Fragment-3 added at the end of the box


	return scroller;
}
Step 5: Creating UI component in Fragment
Every content added in the BOX container will be considered as a fragment. To add UI components in fragment table, box or any other container can be used as a fragment contents . Container is used to align UI components equally. The sample app attached with this article uses one table and two boxes for its three fragment area. Different UI widget (Ex: Label, Button, Calendar etc.) is added in those table and boxes.

Figure: Fragment Structure
The following code shows UI components of first Fragment area
static Evas_Object*  fragment1(Evas_Object *parent)
{

/* Table */

Evas_Object *table = elm_table_add(parent);
elm_table_homogeneous_set(table, EINA_TRUE); //Sets the homogeneous layout in the table.
evas_object_size_hint_align_set(table, EVAS_HINT_FILL, EVAS_HINT_FILL);
evas_object_show(table);

/* Label Widget*/

Evas_Object *label = elm_label_add(parent);
elm_object_text_set(label, "Label");
evas_object_show(label);
elm_table_pack(table, label, 0, 0, 1, 1);// last 4 parameters are col, row, colspan, rowspan

/* Favorite button  Widget*/

Evas_Object *icon,*check;
check = elm_check_add(parent);
elm_object_style_set(check, "favorite");
icon = elm_icon_add(parent);
elm_icon_standard_set(icon, "home");
elm_object_part_content_set(check, "icon", icon);
evas_object_show(check);
elm_table_pack(table,check,1,0,1,1);

/*Slider Widget*/

Evas_Object *slider;
slider = elm_slider_add(parent);
elm_object_style_set(slider, "default");
evas_object_color_set(slider, 155, 15, 0, 255);
evas_object_show(slider);
elm_table_pack(table,slider,0,1,1,1);

/* Spinner Widget*/

Evas_Object *spin;
spin = elm_spinner_add(parent);
elm_object_style_set(spin, "vertical");
elm_spinner_step_set(spin, 2.0);
elm_spinner_wrap_set(spin, EINA_TRUE);
elm_spinner_min_max_set(spin, -25.0, 100.0);
evas_object_show(spin);
elm_table_pack(table,spin,1,1,1,1);

return table;

}
Step 6: Running the example application
After running the sample code, you will see three Fragments in whole UI as screenshots below. Please check attachment for sample code.

Figure: Example Sample App
