Form Validation using Tizen Web
PUBLISHED
Introduction
Form validation normally used to occur at server end after client had entered all necessary data and then pressed Submit button. If the data entered by a client was incorrect or was simply missing, the server would have to send all the data back to client and request that form to be resubmitted with correct information. This was really a lengthy process which used to put a lot of burden on server.
JavaScript provides a way to validate form's data on the client's computer before sending it to the web server.
In this document, a web app is developed to show a simple form validation in Tizen Web app.
Test Settings:
|
Type |
Tizen Web App |
|
SDK |
Tizen SDK 2.4 |
|
Tested on |
Samsung Z3 |
|
Tool |
Tizen Studio |
Steps to do
Step 1: Add Jquery and Jquery Validate library on the index.html. Before that, put these js files on the project lib folder.
<script src="lib/jquery.js"></script>
<script src="lib/jquery.validate.min.js"></script>
Step 2: Add a new JS file to write validation rules and messages,
< script src="js/form-validation.js" > < /script >
Step 3: Write Rules and Messages in the form-validation.js file.
// Specify validation rules
    rules: {
      // The key name on the left side is the name attribute
      // of an input field. Validation rules are defined
      // on the right side
      firstname: "required",
      lastname: "required",
      email: {
        required: true,
        // Specify that email should be validated
        // by the built-in "email" rule
        email: true
      },
      password: {
        required: true,
        minlength: 5
      }
    },
    // Specify validation error messages
    messages: {
      firstname: "Please enter your firstname",
      lastname: "Please enter your lastname",
      password: {
        required: "Please provide a password",
        minlength: "Your password must be at least 5 characters long"
      },
      email: "Please enter a valid email address"
    },
Step 4: Design the form as required and add validation requirements as below. And give ‘id’, ‘name’ of fields and name of form according to the name form-validation.js.
<form action="" name="registration" >
       <label for="firstname">First Name </label>
      <input type="text" name="firstname" id="firstname" placeholder="Steave"/>

      <label for="lastname">Last Name </label>
      <input type="text" name="lastname" id="lastname" placeholder="Smith"/>

	<label for="email">Email </label>
	<input type="email" name="email" id="email" placeholder="steave.smith@samsung.com"/>

	<label for="password">Password </label>
	<input type="password" name="password" id="password" placeholder="●●●●●"/>

      <button type="submit">Register </button>
  </form>
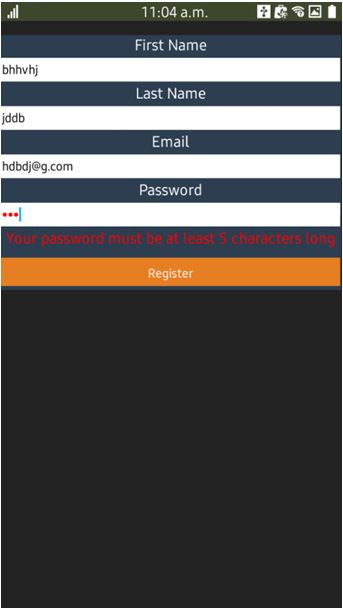
Demo: Download attached sample code and run the app. Some screenshots are given below:

Figure 1: Form validation

Figure 2: Form validation
