Creating a native service for Tizen wearables - part 3: circular UI and shared preferences
PUBLISHED
Introduction
This article is a third part of the “Create a native service for Tizen wearables” series. Before reading this article you should have read the part 1, which explains a simple service running in the background, and the part 2, which shows how to make a simple wearable UI application combined into one package with the service.
In the third part you will learn how to create a simple circular UI on a wearable device and how to exchange preferences between the launcher application and the service.
Prerequisites
Before reading this article please read previous parts of the cycle:
https://developer.tizen.org/community/tip-tech/creating-native-service-tizen-wearables-part-1
Understanding the previous subjects is necessary to get on with this article.
As in this article we introduce EFL genlist and circle UI APIs, you’d better be familiarized with their basics. The following tutorials should be helpful:
Also we will use shared preferences between the launcher and the service. You can have a look on the following tutorial:
Preparation steps and code arrangement
The attached code is a complete source code of the created service and the accompanying app. You can import them to your SDK and after creating the Combined Package (see “Creating a native service for Tizen wearables – part 2” article) they should be ready to install and use when you have a properly set wearable device.
If you had been testing the example source code from “Creating a native service for Tizen wearables – part 2” article, you probably still have the MyService & MyServiceLauncher applications installed on the device. You can follow the steps described in the article and modify those old versions of the Service and UI applications on your own.
Only the parts of the code that have been added to the previous Service and UI applications (as they were in “Creating a native service for Tizen wearables – part 2” article) are discussed in this article.
Steps to do
Step 1. Adding circular UI to the MyServiceLauncher application
- Creating the circular UI genlist
- Adding circular events handling
Step 2. "Hidden mode" shared preference implementation
- MyServiceLauncher: Adding a shared preference for the hidden mode
- MyServiceLauncher: Adding a checkbox for the hidden mode setting
- MyService: Verifying the hidden mode preference setting
Step 1: Adding circular UI to the MyServiceLauncher application
- Creating the circular UI genlist
In the previous article we used simple elm_list to create a simple scrollable menu.
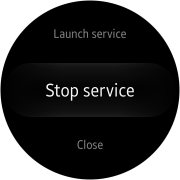
However, if we want to create a UI more visually attractive and compatible with the default circle smartwatch appearance we should use EFL UI extensions for circle surface and a genlist.
Genlist (Generic list) is a container widget which is recommended especially for building advanced lists - the ones containing various types of content or the ones with a large number of elements. In our case we will use genlist because its 3D appearance it is more visually attractive on a wearable device than the appearance of a flat simple list.
Figure 1: The application menu in Circle UI version
That’s why in the appdata_s structure we add the circle genlist handle and the circle surface handle and we declare three genlist item classes: the title class for the list header, the line class for a regular list item and the padding class which creates a margin to the bottom of the list.
typedef struct appdata {
    //...

    // We replace a list from the previous version of the application with a genlist
    Evas_Object *genlist;

    // We add the circle genlist handle and the circle surface handle
    Evas_Object *circle_genlist;
    Eext_Circle_Surface *surface;

    // A class for genlist regular item
    Elm_Genlist_Item_Class genlist_line_class;

    // A class for genlist header
    Elm_Genlist_Item_Class genlist_title_class;

    // A class for genlist ending margin
    Elm_Genlist_Item_Class genlist_padding_class;

    //...
} appdata_s;
According to the genlist requirements we provide the simple text fetching function which will be used in the genlist regular item. This function just will fill the genlist item text part with the text provided under data pointer.
// The text fetching function that will be used for genlist_line_class
static char *plain_label_get(void *data, Evas_Object *obj, const char *part)
{
    char* label = (char*)data;
    return strdup(label);
}
Now we move to the create_base_gui() function, where the whole user interface is being set up. We add the conformant of our UI to the previously declared circle surface.
//in create_base_gui() function body:

    /* Circle surface */
    ad->surface = eext_circle_surface_conformant_add(ad->conform);
Then we start to define genlist item classes. As we said before, we need three genlist item classes: one class for the list header (we called it genlist_title_class), one for regular list itema (we called it genlist_line_class), and one for padding at the end of the list (we called it genlist_padding_class). We use standard styles provided with Elementary for those classes and use previously defined plain_label_get function for fetching labels for genlist items.
/* Genlist and genlist items classes */
    ad->genlist = elm_genlist_add(ad->conform);

    ad->genlist_line_class.item_style = "1text";
    ad->genlist_line_class.func.text_get = plain_label_get;
    ad->genlist_line_class.func.content_get = NULL;
    ad->genlist_line_class.func.state_get = NULL;
    ad->genlist_line_class.func.del = NULL;

    ad->genlist_title_class.item_style = "title";
    ad->genlist_title_class.func.text_get = plain_label_get;
    ad->genlist_title_class.func.content_get = NULL;
    ad->genlist_title_class.func.state_get = NULL;
    ad->genlist_title_class.func.del = NULL;

    ad->genlist_padding_class.item_style = "padding";
Finally, we fill our genlist menu with the same items as in the previous version of the application:
    elm_genlist_item_append(ad->genlist,
                            &(ad->genlist_title_class),
                            (void*)"My Service Launcher",
                            NULL,
                            ELM_GENLIST_ITEM_NONE,
                            NULL,
                            NULL);
    elm_genlist_item_append(ad->genlist,
                            &(ad->genlist_line_class),
                            (void*)"Launch service",
                            NULL,
                            ELM_GENLIST_ITEM_NONE,
                            launch_service_cb,
                            (void*)ad);
    elm_genlist_item_append(ad->genlist,
                            &(ad->genlist_line_class),
                            (void*)"Stop service",
                            NULL,
                            ELM_GENLIST_ITEM_NONE,
                            stop_service_cb,
                            NULL);
    elm_genlist_item_append(ad->genlist,
                            &(ad->genlist_line_class),
                            (void*)"Close",
                            NULL,
                            ELM_GENLIST_ITEM_NONE,
                            close_app_cb,
                            NULL);
    elm_genlist_item_append(ad->genlist,
                            &(ad->genlist_padding_class),
                            NULL,
                            NULL,
                            ELM_GENLIST_ITEM_NONE,
                            NULL,
                            NULL);

    elm_object_content_set(ad->conform, ad->genlist);
    evas_object_show(ad->genlist);
- Adding circular events handling
Now we want to connect our genlist with circular UI events such as a rotary scrolling event:
//in create_base_gui() function body:

    /* Circle genlist extension */
    ad->circle_genlist = eext_circle_object_genlist_add(ad->genlist, ad->surface);
    eext_circle_object_genlist_scroller_policy_set(ad->circle_genlist, ELM_SCROLLER_POLICY_OFF, ELM_SCROLLER_POLICY_AUTO);
    eext_rotary_object_event_activated_set(ad->circle_genlist, EINA_TRUE);
At this stage we have fully operational circle UI for our application.
Step 2: "Hidden mode" shared preference implementation
The second improvement done to the service described in this article, will be using shared preferences between the launcher application and the service application. We will show you how to do this on the “hidden mode” implementation example.
Hidden mode in MyService application will be an option in which when the sensor event occurs, the Launcher UI is not shown, only the notification sound is played.
To do this we will introduce Preference API from the Application Framework. Preference gives you a possibility to store key-value pairs for your application settings. Those preferences are kept after the application is closed and when the device is shut down. Moreover, the preferences can be shared between applications that are combined into one package.
- MyServiceLauncher: Adding a shared preference for the hidden mode
First of all, we must include the app_preference.h header.
#include <app_preference.h>
Also we can define our preference key as a macro (both in the launcher application and in the service) to avoid mistake when checking it repeatedly:
#define PREF_KEY_HIDDEN_MODE "hidden_mode" // the key name for the hidden mode setting in preferences
Then we must check if the preference was already set. This is important in the first application run. We must set up the default setting if the key was not created yet.
//in app_create() function body:

    bool exists = false;
    if (preference_is_existing(PREF_KEY_HIDDEN_MODE, &exists) == PREFERENCE_ERROR_NONE)
    {
        if (exists == false)
        {
            if (preference_set_boolean(PREF_KEY_HIDDEN_MODE, false) == PREFERENCE_ERROR_NONE)
            {
                dlog_print(DLOG_INFO, LOG_TAG, "Hidden mode setting was not present, setting to default false value...");
            }
            else
            {
                dlog_print(DLOG_ERROR, LOG_TAG, "Error setting preference for hidden mode!");
            }
        }
        // If the preference already exists, everything is all right - doing nothing...
    }
    else
    {
        dlog_print(DLOG_ERROR, LOG_TAG, "Error setting preference for hidden mode!");
    }
- MyServiceLauncher: Adding a checkbox for the hidden mode setting
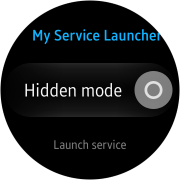
Now we must add a setting option to our UI. To do this, we must add one more field to our genlist.
Figure 2: The application UI with "Hidden mode" option
The field will contain a label and a checkbox, so we create another genlist item class:
// in appdata_s struct definition:

Elm_Genlist_Item_Class genlist_checkbox_class;
As before, we create a text fetching function for the text field of the class:
// The text fetching function that will be used for genlist_checkbox_class
static char *checkbox_label_get(void *data, Evas_Object *obj, const char *part)
{
    return strdup("Hidden mode");
}
However apart of that, we have to add also the content fetching function. We add a checkbox to the “elm_icon” field in the genlist item. Then we set the checkbox to reflect the current hidden mode setting (remember to define the PREF_KEY_HIDDEN_MODE macro as the same value as in MyServiceLauncher app!) . Finally, we add a callback that changes the mode when checkbox setting is changed by a user.
static void set_mode_cb(void *data, Evas_Object *obj, void *event_info);

static Evas_Object *checkbox_content_get(void *data, Evas_Object *obj, const char *part)
{
    if (!strcmp(part, "elm.icon"))
    {
        // In a part named "elm_icon" we will place the checkbox widget.
        Evas_Object *checkbox = elm_check_add(obj);
        elm_object_style_set(checkbox, "on&off");

        // We don't want to propagate checkbox click event to the genlist item:
        evas_object_propagate_events_set(checkbox, EINA_FALSE);

        // Displaying the current hidden mode setting
        bool mode = false;
        if ((preference_get_boolean(PREF_KEY_HIDDEN_MODE, &mode) == PREFERENCE_ERROR_NONE)
            && (mode == true))
        {
            dlog_print(DLOG_INFO, LOG_TAG, "Hidden mode is true!");
            elm_check_state_set(checkbox, EINA_TRUE);
        }
        else
        {
            dlog_print(DLOG_INFO, LOG_TAG, "Hidden mode is false!");
            elm_check_state_set(checkbox, EINA_FALSE);
        }
        evas_object_smart_callback_add(checkbox, "changed", set_mode_cb, NULL);
        return checkbox;
    }
    // We do nothing for any other part.
    else return NULL;
}
Here is the callback definition. We use Preference API to store the current hidden mode setting.
static void set_mode_cb(void *data, Evas_Object *obj, void *event_info)
{
    bool mode = false;
    if ((preference_get_boolean(PREF_KEY_HIDDEN_MODE, &mode) == PREFERENCE_ERROR_NONE)
        && (mode == true))
    {
        if (preference_set_boolean(PREF_KEY_HIDDEN_MODE, false) == PREFERENCE_ERROR_NONE)
        {
            dlog_print(DLOG_INFO, LOG_TAG, "Hidden mode was true! Setting to false");
        }
        else
        {
            dlog_print(DLOG_INFO, LOG_TAG, "Setting hidden mode failed!");
        }
    }
    else
    {
        if (preference_set_boolean(PREF_KEY_HIDDEN_MODE, true) == PREFERENCE_ERROR_NONE)
        {
            dlog_print(DLOG_INFO, LOG_TAG, "Hidden mode was false! Setting to true");
        }
        else
        {
            dlog_print(DLOG_INFO, LOG_TAG, "Setting hidden mode failed!");
        }
    }
}
As it was described in the Step 1, we construct the genlist item class for the hidden mode setting field:
// in create_base_gui() function body:

    // The genlist item class for the field with a label and a checkbox to the right.
    ad->genlist_checkbox_class.item_style = "1text.1icon.1";
    ad->genlist_checkbox_class.func.text_get = checkbox_label_get;
    ad->genlist_checkbox_class.func.content_get = checkbox_content_get;
    ad->genlist_checkbox_class.func.state_get = NULL;
    ad->genlist_checkbox_class.func.del = NULL;

    elm_genlist_item_append(ad->genlist, &(ad->genlist_checkbox_class),(void*)ad, NULL, ELM_GENLIST_ITEM_NONE, NULL, (void*)ad)
- MyService: Verifying the hidden mode preference setting
Now, when we implemented setting the preference in the Service Launcher UI, all that we need to do in the Service application is to check the preference setting when the sensor event occurs.
We include the app_preference.h header in the MyService application as well:
#include <app_preference.h>
Then, we modify the sensor_event_callback() to show MyServiceLauncher application only when the hidden mode is set to off.
// In the sensor_event_callback() function body:

// ... When sensor reading criteria are met and the sound is played,
// we launch the launcher UI application only when the hidden mode setting is off.

bool mode = false;
if ((preference_get_boolean(PREF_KEY_HIDDEN_MODE, &mode) == PREFERENCE_ERROR_NONE)
    && (mode == false))
{
    // We launch MyServiceLauncher as in the old version of MyService...
    // The code below doesn't differ from the version in the previous article.
    app_control_h app_control;
    if (app_control_create(&app_control)== APP_CONTROL_ERROR_NONE)
    {
        //Setting an app ID.
        if (app_control_set_app_id(app_control, MYSERVICELAUNCHER_APP_ID) == APP_CONTROL_ERROR_NONE)
        {
            if(app_control_send_launch_request(app_control, NULL, NULL) == APP_CONTROL_ERROR_NONE)
            {
                dlog_print(DLOG_INFO, LOG_TAG, "App launch request sent!");
            }
        }
        if (app_control_destroy(app_control) == APP_CONTROL_ERROR_NONE)
        {
            dlog_print(DLOG_INFO, LOG_TAG, "App control destroyed.");
        }
    }
}

// If hidden mode is on, we do not launch the UI application and play sound only.
Summary
Now you know how to create a genlist-based circular menu and how to share common preferences between the UI application and the background application. This article was the third one of a “Create a native service for Tizen wearables” series which covered most important issues concerning creation of a simple service for Tizen wearable devices.


